Showing posts with label SSIS. Show all posts

August 30, 2010

Data Flow Task - Sql Command From Variable

Normally in Data Flow Task we directly retrieve data from sql tables. But if we face a situation like we don't want all the data in the table but some conditional data. Here we can use two Data Flow Task methods, Sql Command method and Sql Command From a Variable method.

We can use sql command method for directly execute a sql command. But if we use say, a variable that set the value run time sql command from variable is the best method to use.


I'm going to demonstrate how to do the method 'Sql Command From Variable'. Here i'm going to do is get the date and holiday from the holidays table for current month (where its month id equal to current month id).


I drag and drop two Script Tasks and one Execute Sql Task.Then I create four variables, Month, MonthId, Year and SqlQuerry and I give a value to the SqlQuerry variable (This value will be replaced in the run time).


In the Control Flow first I set the current month and the current year for the Month and Year variables using one Script Task. Then I get the current month id from my dbo.Month table using the Execute Sql Task and then I set the variable SqlQuerry in the run time using other Sql Task.


This is how I set the SqlQuerry from Sql Task.


Now I drag and drop a Data Flow Task and in the Data Flow I drag and drop Ole Db Source, Data Conversion and Excel Destination.


In the Ole Db Source I create a connection from ole connection manager and set Sql Command From Variable for Data Access Mode.


And set the variable name as our variable name, SqlQuerry.


Then we can see the output columns from the Columns tag.


Then connect the source to the Data Conversion task and convert the 'Description' column to Unicode String (because the default type String does not match to the destination column type). Then create an excel file for the destination.


And create the Excel Destination and connect the Data Conversion task to the Excel Destination.


Finally execute the package and we can see the result.


This is the result.


August 26, 2010

Conditional Statement in Derive Column

Derive Column is another very useful Data Flow Transformation. We normally use it to derive one or more columns as it name described, by calculate some values or using other columns. Here, I'm going to explain how to do conditional statement in Derive Column.

First I drag and drop a Data Flow Task into the designer. within  this Data Flow Task I add Excel Data Source, Derive Column and Flat File Destination.


This is my Excel Source.


My Excel File contains few customer details.


I want to get this data into a Flat File with another column contains if the customer, Adult(Age > 20) or Youngster(Age<20).So I can write,

if(Age>=20)? "Adult" : "Youngster" ;

But this not works in Derive Column, we have to write,


(Age>=20)? "Adult" : "Youngster"


 Then we can arrange Flat File Destination.


Then we can run the package and see the result.


Here is the Flat File with data we want. You can see the extra column we made. I named it More Details.

May 20, 2010

A Simple ETL With SSIS

In my second post of Data Integration i described a little bit about DTS which was used by Sql Server 2000. After SQL Server 2005 came, it introduced a new tool for data integration which is Sql Server Integration Services (SSIS). In this post i'm going to describe a simple example of ETL.

For work with SSIS, Sql Server used a tool called Business Intelligence Development Studio (BIDS). First we look at BIDS before we start.


We design our ETL in the Design View. Mainly there is two design views, Control Flow View and Data Flow View.

Lets see how to make an ETL:

Always we start form Control Flow View. Go to Control Flow View and in the toolbox drag and drop the 'Data Flow Item'. To specify the behavior of data we have to build Data Flow Item.


To build the data flow double click the Data Flow Item or right click it and select Edit. Then we get data flow view.


Now you can see the toolbox with Data Flow Items. Select the 'Flat File Source' Item from it and drag and drop it to the design.


Now double click it to configure.


Here you have to make a connection to the file you are going to extract data. To do so click the new button.
Then you get Flat File Connection Manager Editor. There you have to give the file path, and several other things.


You have to fill this according to your flat file.
This is my flat file. I separate columns by comma and rows by semicolon.


 Give a name for the connection manager and browse the file by click Browse button.


Then specify 'Text Qualifier'. According to my file it is a space. Tick the 'Column Names In The First Data Row' check box if your file has column names in the first row. Then go to the 'Columns' tab.


Here you want to specify the Row Delimiter and Column Delimiter. As my file it is semicolon and comma. Then click OK.


Then you can see the data by clicking the Preview button. Then if everything is fine click OK.
Now you have configured the Flat File Source. Then you have to select destination for save the data. Here i select 'OLE DB Destination'. Drag and Drop it to the design view. Now select the Flat File Source you can see it contain two arrows. We use green arrow to redirect data in successful process and red arrow to redirect data in failure process. Click the green arrow and then click the 'OLE DB Destination'.


Double click it to configure it.


Again you have to make connection called 'OLE DB Connection'. Click the new button. Then you will get 'Configure OLE DB Connection Manager' window.


Click new to make a new connection.


Then give the server name and the database name you want to save the extracted data.


Then go to 'Mapping' tab to map the data.


Here mappings are ok. Then click OK. Now we created the data flow. It is look like this.


But there is a red icon in OLE DB Destination Item. So there is a problem in it. This is happen wen extracted data are not in the correct format. We have to convert the data and give them to the OLE DB Destination.
To do that delete the arrow between Flat File Source and OLE DB Destination and drag and drop the 'Data Conversion Item' into the design view. Then connect the Flat File Source to the Data Conversion item and double click it.


Tick the name and class items. Change the data type them as Unicode String[DT_WSTR]. Then if you want you can change the output alias as well. Don't forget to set the length as the length in database table columns Then click OK.
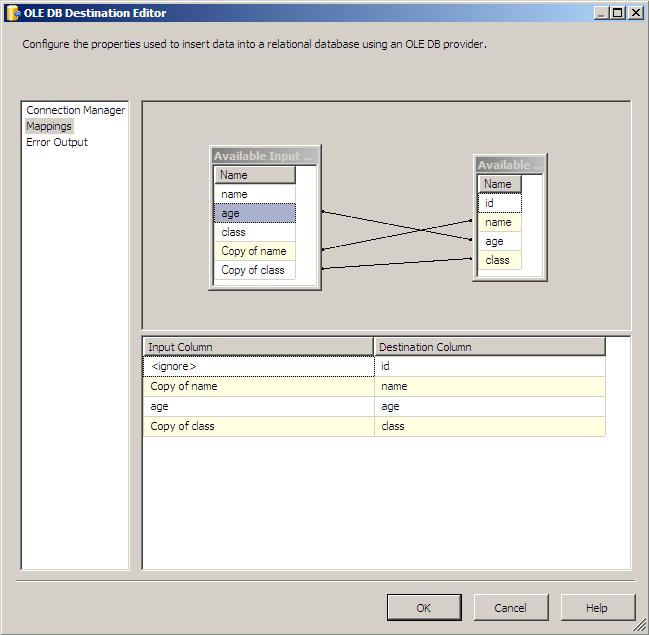
Then connect the Data Conversion Item with PLE DB Destination with green arrow and double click the OLE DB Destination.


Then you have to change the mappings in it. Connect the Copy of name to the name and Copy of class to the class. Then click OK.
Now we done the ETL. Now run it. You can do it several ways. There is a green arrow icon in the top of the BIDS, click it or right click the package and select Execute Package.
Then you can see the data in the database.


Like wise you can build different ETLs using different toolbox items.

May 17, 2010

SQL Server Import & Export Wizard

Sql server import and export wizard is one of the several Sql Server Integration Services (SSIS) building tools. It can be accessed from DTSWizard.exe, Sql Server Management Studio (SSMS) and Business Intelligence Devolopment Studio (BIDS).
Export data from sql server to an Excel file:

First we want to run the Sql Server Import & Export Wizard. To do that go to run and type DTSWizard.exe and press ok.Then it will open.


Click next. Then it will open another window.


In here specify the data source which the data come from. I chose SQL Server Native Client which is the sql server. Then choose what is the authentication and the database and click next. It will redirect to another window.


Then choose the destination which the data goes to. In here i chose the employeeExcel.xlsx file. Next choose excel version of the file. There is a check box called first row has column names. If we tick it then the first row displayed column names. Click next.


In this phase we have to choose one of two options. First one is 'copy data from one or more tables or views'. If we tick it we can directly select tables or views that data come from. Second one is 'Write a query to specify the data to transfer'. If we tick it we can write a sql query and extract data. First we look at first choice.


This screen displays the source and the destination we chose. Also we can specify the destination work sheet and we can map parameters by click 'Edit Mapping' button. We can also preview the extracted data by clicking the 'Preview' button.


In this phase we can tell run the package immediatly and we can save this package in a sql server or file system.

Here i save the package in my file system and i chose 'Do Not Save Sensitive Data' for package protection level because i dont want to save any sensitive data.


Then name the package and give the description. Specify the location to save the package and click next.


Then it will give us the report that what we have done. If it is ok then we can complete the process.


It will complete the process successfully and we can check whether the data copied successfully by opening the excel file.


Without choosing directly, what are the destination tables or views we can execute a sql query.


Choose 'Write a Query To Specify The Data To Transfer'.


And write a query as u wish. We can select brows a sql file that already wrote also by clicking the Brows button. Here i select the only name and age columns from Employee table. I don't want id column here. After write the query check whether the query is valid by pressing the Parse button.


The sql query is valid.


Then promt to the window that we can select the destination sheet. After specify a sheet name pressEdit Mapping button to map the data.


Here i got woning. It told there is a problem with age column type. We don't want to worry about it. Put the tick to convert and we can proceed.


The execution complete successfully.


The data will be successfully added to the excel file without id column.

In this post i demonstrated how to export data from the sql server to an excel file. Import data process also similar to this. We can give excel file, flat file or any other data source and sql server as the destination. Then like this we can import data to the database.

LinkWithin

Related Posts with Thumbnails